My friend Karoline and I made Weeping Angel costumes from Doctor Who this spring. We were going to a convention in Larvik called Banzaicon, and their theme was Time Travelling Trouble. We wanted to to something from Doctor Who, and after googling Weeping Angel cosplays we decided to try for ourselves. Neither of us are very exprienced costume makers, and we didn't quite know where to get the materials we needed, but we did our best. We found some great tutorials that inspired us, and if it wasn't for them we wouldn't have a clue what to do. So a big thanks to
Kilayi's Cosplay,
Penwiper and
Alex for ideas about the wings.
The first thing to do was get some reference pictures. We watched the episode "Blink" and took a lot of screenshots, like this:
The Dress
First we sewed an underdress. This was practically me lying on the fabric, drawing a rough outline of myself, cutting out the pieces and sewing them together. Karoline and me are built almost exactly alike, so what fitted me fitted her. The fabric is cotton fabric from
Stoff og Stil
I sewed a zipper into the back of the underdress to make it easy to put on and off.
The Angels outer dress we made in to parts. First, the skirt.
The width of the fabric we bought was about 140 cm, so we just lay down the fabric and cut it at about 3 meters length.
Then we sew a running seam along the length in order to gather the fabric at the waist and create the folds we wanted.
We sew the two widths of the skirt together, leaving some space at the waist to get it on and off. It is fastened with velcro.
For the bodice we used the same technique for the wrinkled part. This is also 3 meters in length.
For the top of the bodice I cut out a front and back piece like this:
I sewed them together at the shoulders and sewed the gathered fabric on right above the breasts. The bodices also have elastic bands sewed on at the bottom to keep them tight to the waist. At the bottom of the skirt there is a hola hoop (kid sized) to get the right shape.
The dresses are now ready for painting, and we had to suit up.
We bought 3 liters of grey acrylic wall paint, the cheapest they had at
Coop Obs Bygg. First we painted the skirts and bodices with this colour as a base, then we added darker and lighter colours later to accentuate the folds.
When finished the skirt and bodice was stiff and looked and felt like stone. Not that it was heavy, it just looked like... a statue, which is what we're aiming for, so we were happy.
The Wings
Here we looked a lot at the reference photos. This whole costume is made as judged by the eye, and the wings are no exception. First we made a pattern on brown paper.
We drew the feathers on the front on one piece and the feathers on the back on the other piece. We wanted to make the wings in foam, but we had no idea where to get it, so we ended up bying cheap yoga mats on
ebay. We drew out all the individual pieces on the yoga mats, labeled them and cut them out. We had to make two sets of wings, that is four inividual wings, four backsides and four frontsides. So we cut out feathers for 8 sides.
 |
| The pieces for the backs. |
 |
| The pieces for the fronts. |
We ended up using tapestry glue to glue them all together. It was cheap, I had a lot of it lying around and it worked quite well.
Inside the wings there is a skeleton of chicken wire and some plastic tubes for the fitting. To get the shape we wanted the chicken wire is rounder at the top.
We didn't have enough foam to cover the large piece at the back, so we used some thicker, styrofoam-ish foam my dad had lying around. It's the purple thing in the picture below. To make it easier to glue the ends of the purple and green foam together I added some papier-mâché over the chicken wire.
Now they are ready for paint. I used the same gray acrylic wall paint base we used on the dresses, then added in darker streaks to indicate feathers. On the backs, the purple foam automatically became darker, but in the end that looked quite nice.
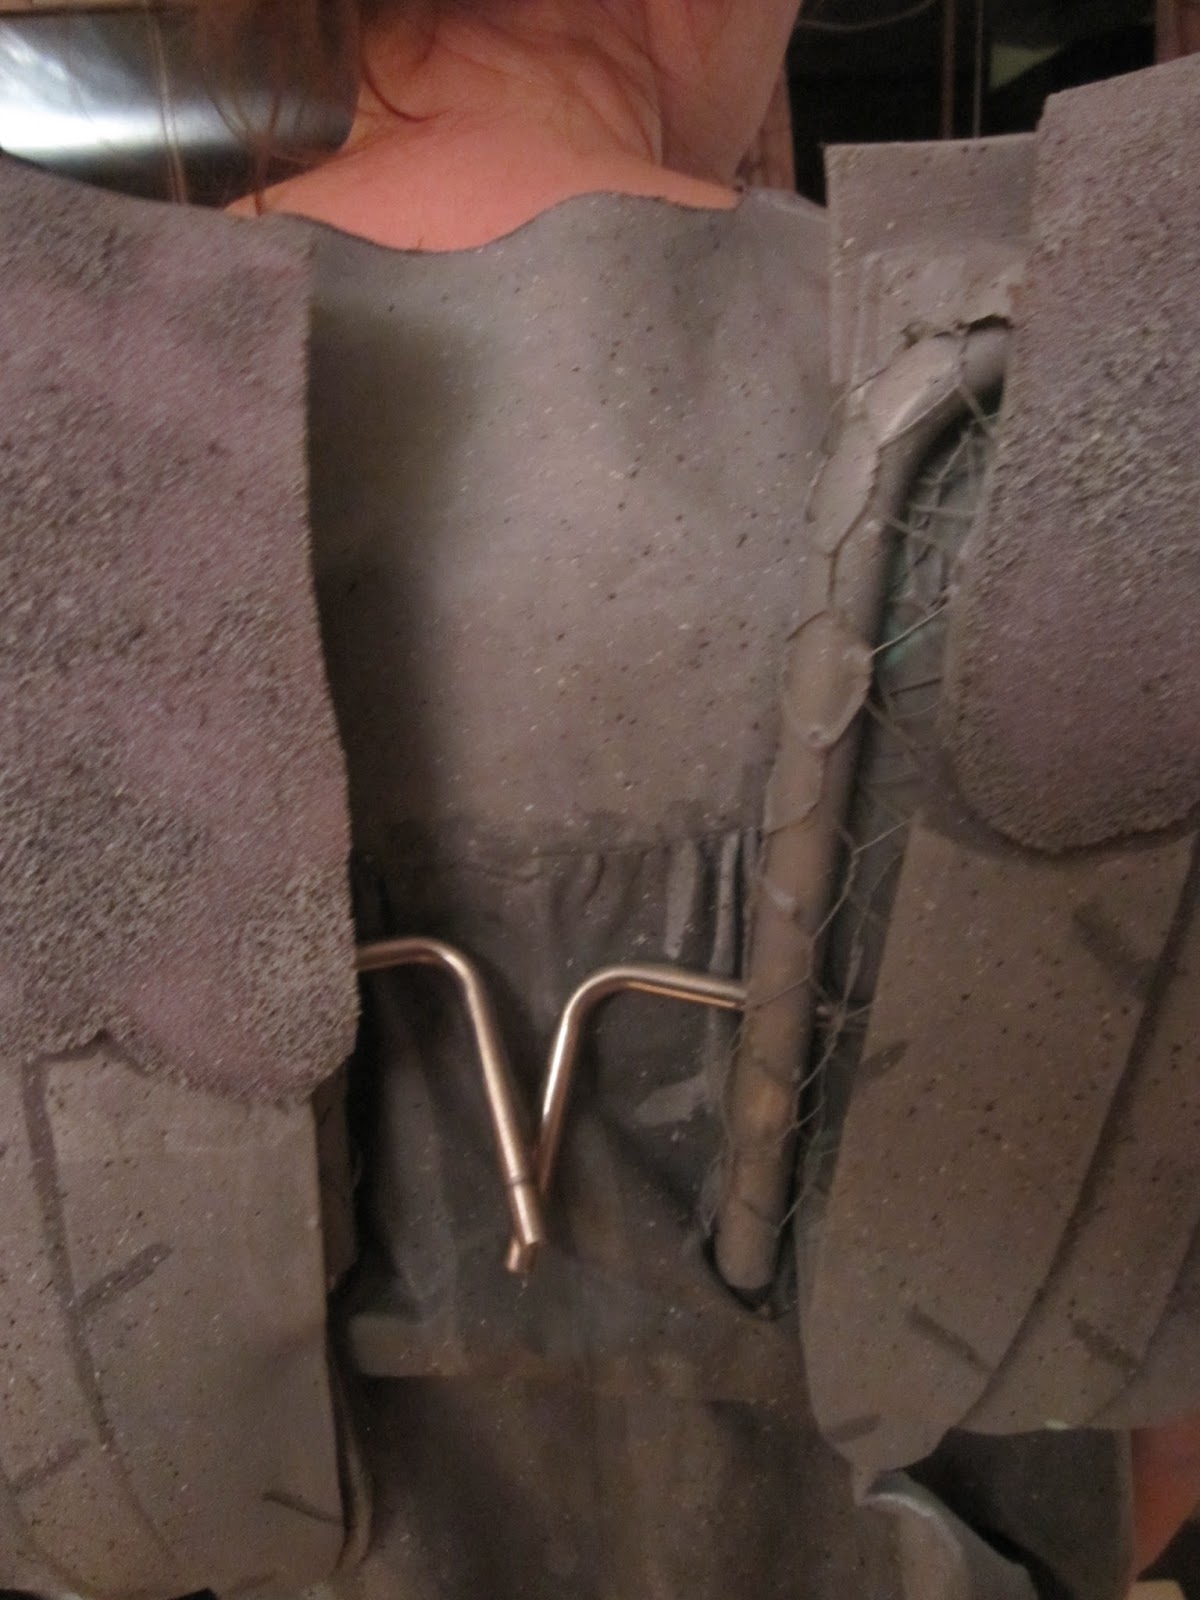
To fasten the wings to our backs we had a lot of help from my dad. I am forever grateful for that help. We needed a system that would allow us to easily take the wings on and of, since we needed to bring them on the plane from Trondheim to Larvik.
I will try to describe how the fastening mechanism work. There is a wooden board with padding attached to our backs with shoulder straps, over the underdress. There are also thick metal wire going down from the wooden board to support and align it down our backs. There are straps going from the metal wire and around our waist. I forgot to take a picture of it, so you'll have to do with this crude sketch:
The bodice was slipped on over this and the two metal rods protruded out through two slits in the bodice.
In the skeleton of the wings there were some plastic tubes, as I mentioned above. These were simply thread onto the metal rods.
To keep the wings in place we used two bent metal pieces that went from the inside of our wings onto the wooden board, like this:
On the inside:
My dad would have done this differently if we had more time. This is kind of a last second solution. We had to adjust them a bit during the convention because the metal pieces sometimes slipped into the wings but it all worked out fine in the end.
The Wigs
We started out braiding our hair and covering it with plastic foil.
Then we covered our heads in modroc (
gipsbånd) and slipped it of when it had dried.
For the hairs we used silicone caulk (fugemasse) because it was really cheap at Obs Bygg. We used about one canister on each wig. In the end they turned out to be quite heavy, but not to heavy.
We painted them with the same gray paint as the dresses and wings, then added darker and lighter stripes. If I ever do something like this again I will paint the modroc before I add the hair, it was difficult to cover all the nooks and crannies in paint.
The Arms
We did not paint our arms but made gloves out of tights. We made the hands out of the feet by sewing fingers. It looks very nice when you turn the tights inside out and get the seam on the inside.
We cut out the crotch area so we could slip it over our heads. When painting them we used a mix of the acrylic paint and fabric paint so it wouldn't be to stiff and crack when we stretched the fabric. Ideally, the gloves should be painted and allowed to dry on the body, but since the convention was drawing close and Karoline had left me for Spain at this point I didn't have the time.
For the finishing touch on the gloves, wigs, dresses and wings we sprayed it with this granite spray we bought at
Panduro.
It was very effective and we did not regret spending 199 NOK on it.
All the pieces ready I packed them into a suitcase, packed the wings and hola hoops in bubble wrap and brown paper to be sent as special luggage, and hopped on a plane. I stayed at my aunt and uncle's place not to far from the convention and a huge thanks goes to them for letting us stay and occupying their bathroom for as long as we did on saturday morning.
Getting the angels on turned out to take longer time than we thought.
We used grey snazaroo for the face and neck, along with some eyeshadow for the shadows on the face. We considered making masks but we didn't have the time and we thought it would be a drag to walk around in all day.
In the (very little flattering) photo of me above you can se a close up of the make up. I like the way it turned out. You can also see the
white mesh lenses we used. They made everything a white haze. We both are a bit near sighted and we couldn't find proper corrective white mesh lenses, so we didn't see all that much that day. Another detail you can see are the nails. We glued fake nails over the gloves and coloured them grey with nail polish. We didn't have the time to do it properly so mine fell of during the day, but it looked pretty cool when they were all on.
I lost a lot of sleep over this costume, but when we came to the convention it was totally worth it! Everybody (that know of Doctor Who) thought we were scary, and many came to talk and take pictures. We even got featured in some of the local newspapers,
Østlandsposten and
Vestfold Blad.
Any questions? Feel free to ask.


Love this!! Good work x
ReplyDeleteThanks from the both of us :)
DeleteHow long did it take you to make these? I wanted to be a Weeping Angel for Halloween, but thats in 7 days, so I don't know if that will be enough time
ReplyDeleteI was just wondering the same thing because I would love to stand on my doctor who friends lawn and freak her out. I had thought that since I'm short on time another to freak her out might be to dress in my regular clothes with a couple of friends and put on gas masks and walking around repeating "are you my mummy?". It would be much more fun to be a Weeping Angel though.
DeleteI think about three weeks went by from start to finish on this project. We didn't work every day of those three weeks, and we were two up until the last week when I had to finish them myself. I guess one weeping angel costume can be made in a week if you work hard, but remember these things always take longer than you think it will.
DeleteI wish you both a happy Halloween and the best of luck on your costume plans.
Roughly, how much fabric did you use for the complete costume? ....what was the width of the fabric? Thank you!
DeleteMy friend Karoline and I made Weeping Angel costumes from Doctor ... ccosplaycostumes.blogspot.com
ReplyDeleteI'm making a cosplay of this for Comicon and really love your tutorial! Hopefully mine will look as good as yours :P Anyway thanks for posting!
ReplyDeleteI'm almost 100% sure I am cosplaying a weeping angel for the Calgary (canada) Comic Con! Love this, and your detailing is spot on! So great!!Thanks for sharing!
ReplyDeleteIncredible! Smashing! Brava! Artistry & Craftmanship executed with Imagination & Ingenuity! I sincerely applaud your efforts.
ReplyDeletewhen you drew the feathers individually on the mats, how did you get them to be the same size as the ones you drew on the brown paper? They came out perfect!
ReplyDeleteTôi đã mất rất nhiều ngủ trong bộ trang phục này, nhưng khi chúng tôi đến công ước đó hoàn toàn là giá trị
ReplyDeletesơn đồ gỗ
sơn đồ gỗ tại nhà
son cho cua go thi son loai nao
sơn gỗ loại nào tốt
This comment has been removed by the author.
ReplyDeleteOpen year-round, the costume shop boasts a wide range of costumes with a friendly staff eager to assist you restrict your choices. Learn more about Cosplay click on this site.
ReplyDeleteYou’ve got some interesting points in this article. I would have never considered any of these if I didn’t come across this. Thanks!. amazing spiderman suit
ReplyDeleteRespect and I have a tremendous proposal: Who Repairs House Foundations house renovation before after
ReplyDelete